
Ticks are common external parasites that can pose serious health risks to dogs, including the transmission of diseases such as Lyme disease, ehrlichiosis, and anaplasmosis. Removing a tick promptly and correctly is essential to minimize the risk of infection and ensure your dog’s safety. This comprehensive guide will walk you through the steps to safely remove a tick from your dog, as well as provide tips for prevention and post-removal care.
Why Is Tick Removal Important?
Ticks are not just a nuisance; they can transmit harmful pathogens that cause diseases in both dogs and humans. When a tick attaches to your dog’s skin, it feeds on their blood and can transmit bacteria, viruses, or parasites into the bloodstream. The longer a tick remains attached, the higher the risk of disease transmission. Therefore, prompt and proper removal is critical.
What You’ll Need to Remove a Tick
Before attempting to remove a tick, gather the following supplies:
- Fine-tipped tweezers or a tick removal tool (available at pet stores or online)
- Disposable gloves (to protect yourself from potential pathogens)
- Antiseptic solution (e.g., rubbing alcohol or iodine)
- A small container or zip-lock bag (to store the tick for identification, if needed)
- Treats (to reward your dog and keep them calm)
Step-by-Step Guide to Safely Remove a Tick
Step 1: Prepare Your Dog
- Choose a well-lit area to work in.
- Calm your dog by speaking softly and offering treats.
- If your dog is anxious or fidgety, ask someone to help hold them still.
Step 2: Put on Gloves
Wear disposable gloves to protect yourself from potential exposure to tick-borne diseases.
Step 3: Locate the Tick
- Part your dog’s fur to expose the tick.
- Identify the tick’s head and mouthparts, which are embedded in the skin.
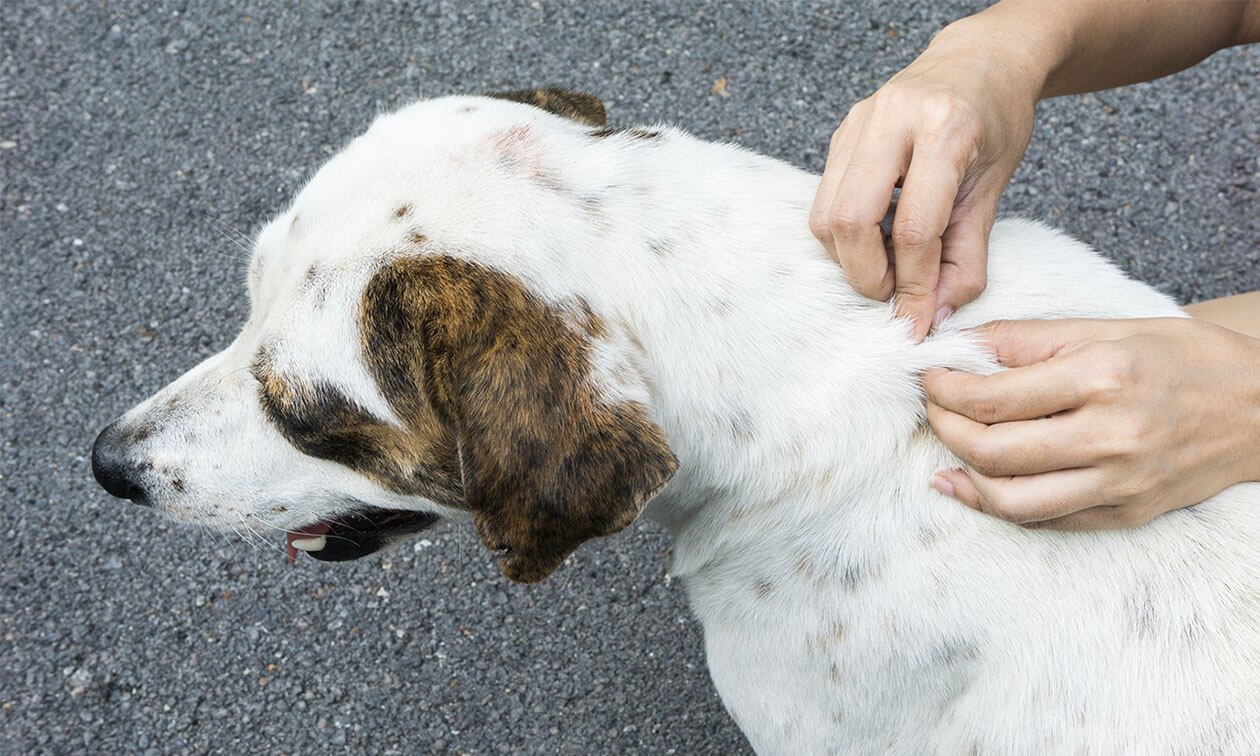
Step 4: Remove the Tick
- Using Tweezers:
- Grasp the tick as close to your dog’s skin as possible, ensuring you have a firm grip on the head.
- Pull upward with steady, even pressure. Avoid twisting or jerking, as this can cause the tick’s mouthparts to break off and remain in the skin.
- If using a tick removal tool, follow the manufacturer’s instructions carefully.
- Using a Tick Removal Tool:
- Slide the tool under the tick, close to the skin.
- Gently lift and twist the tool to dislodge the tick.

Step 5: Dispose of the Tick
- Place the tick in a small container or zip-lock bag with a bit of rubbing alcohol to kill it.
- If you’re concerned about disease transmission, you can save the tick for identification by your veterinarian.
Step 6: Clean the Bite Area
- Use an antiseptic solution to clean the bite area on your dog’s skin.
- Monitor the area for signs of infection, such as redness, swelling, or discharge.
Step 7: Reward Your Dog
- Offer your dog a treat and praise them for staying calm during the process.
What NOT to Do When Removing a Tick
- Do not use your fingers: Squeezing the tick with your fingers can increase the risk of disease transmission.
- Do not crush the tick: Crushing the tick can release harmful pathogens.
- Do not use home remedies: Avoid using substances like Vaseline, nail polish, or heat to remove the tick. These methods can irritate the tick and cause it to regurgitate into your dog’s bloodstream, increasing the risk of infection.
Post-Removal Care and Monitoring
After removing the tick, keep an eye on your dog for any signs of tick-borne illnesses. Symptoms may include:
- Fever
- Lethargy
- Loss of appetite
- Joint swelling or lameness
- Skin rash or irritation
If you notice any of these symptoms, contact your veterinarian immediately. Additionally, inform your vet about the tick bite, as they may recommend testing or preventive measures.
Preventing Tick Infestations
Prevention is always better than cure. Here are some effective ways to protect your dog from ticks:
- Use Tick Preventatives:
- Consult your veterinarian for prescription tick preventatives, such as topical treatments, oral medications, or tick collars.
- Regular Grooming:
- Brush your dog’s coat regularly and check for ticks after outdoor activities.
- Keep Your Yard Clean:
- Mow the lawn, trim bushes, and remove leaf litter to reduce tick habitats.
- Avoid Tick-Infested Areas:
- Steer clear of tall grass, wooded areas, and dense vegetation during walks.
- Vaccination:
- In areas where Lyme disease is prevalent, ask your vet about vaccinating your dog.
When to Seek Veterinary Help
While most tick bites can be managed at home, there are situations where professional help is necessary:
- If you’re unable to remove the entire tick.
- If the tick’s mouthparts remain embedded in your dog’s skin.
- If your dog shows signs of infection or illness after a tick bite.
- If you live in an area with a high prevalence of tick-borne diseases.
Conclusion
Ticks are a common threat to dogs, but with the right knowledge and tools, you can safely remove them and protect your furry friend from potential harm. By following the steps outlined in this guide, you can ensure that tick removal is done correctly and minimize the risk of complications. Remember, prevention is key, so take proactive measures to keep your dog tick-free and healthy.
Regular check-ups with your veterinarian, combined with a consistent tick prevention routine, will go a long way in safeguarding your dog’s well-being. Stay vigilant, and enjoy many happy, tick-free adventures with your canine companion!

Related Post

The Cockapoo: A Guide to the Lovable Hybrid Dog
In the realm of canine companions,where genetic artistry intertwines tradition…
The Ultimate Guide to Puppy Grooming
Welcome to the ultimate guide to puppy grooming! From the…

The Maltipoo: A Guide to This Adorable Hybrid
Prepare to be captivated by the charming enigma that is…